Hookpad User Guide
Version 2.1.0
Contents
Contents
Introduction Video
The following 3-minute video will show you how to add notes and chords, change durations, and use keyboard shortcuts. After watching it, you'll be able to create a simple song.
Melody
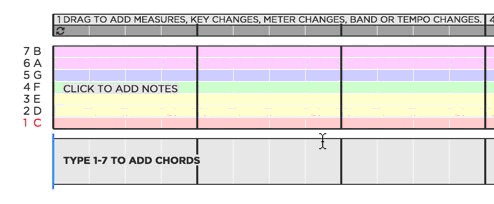
Adding / Deleting Notes
To add notes, click in the melody area and type the numbers 1-7 for the seven notes of the major scale. By default, notes are added in the octave of the previous note. Type delete/backspace to delete notes, just like you would in a text editor.
Selecting Notes
Select multiple notes as you would in a text editor:
- Draw a selection box
- Command/control-click and shift-click are also supported.
- Hold shift and use the left/right arrow keys to select the note on the left/right of the cursor
Copying & Pasting Notes
Within the Same Project
- Select some notes
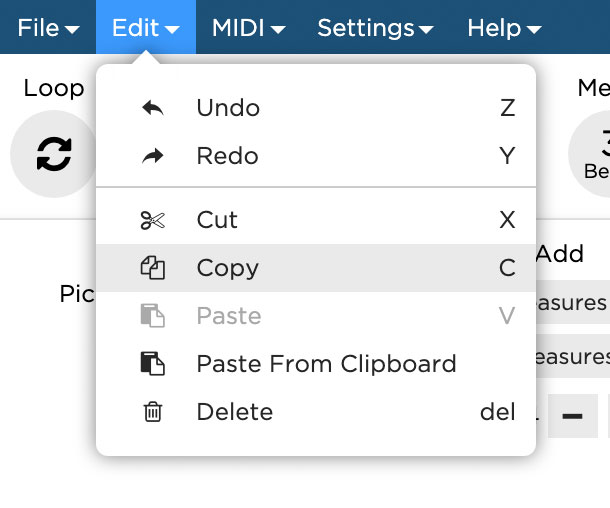
- Use the keyboard shortcut “c” to copy the selection to the clipboard. Alternatively, use Edit → Copy.
- Place the cursor at the desired insertion point
- Use the keyboard shortcut “v” to paste. Alternatively, use Edit → Paste.
Between Different Projects
- In project A: select some notes
- In project A: use the keyboard shortcut “c” to copy the selection to the clipboard. Alternatively, use Edit → Copy
- In project B: place the cursor at the desired insertion point
- In project B: use Edit → “Paste From Clipboard”
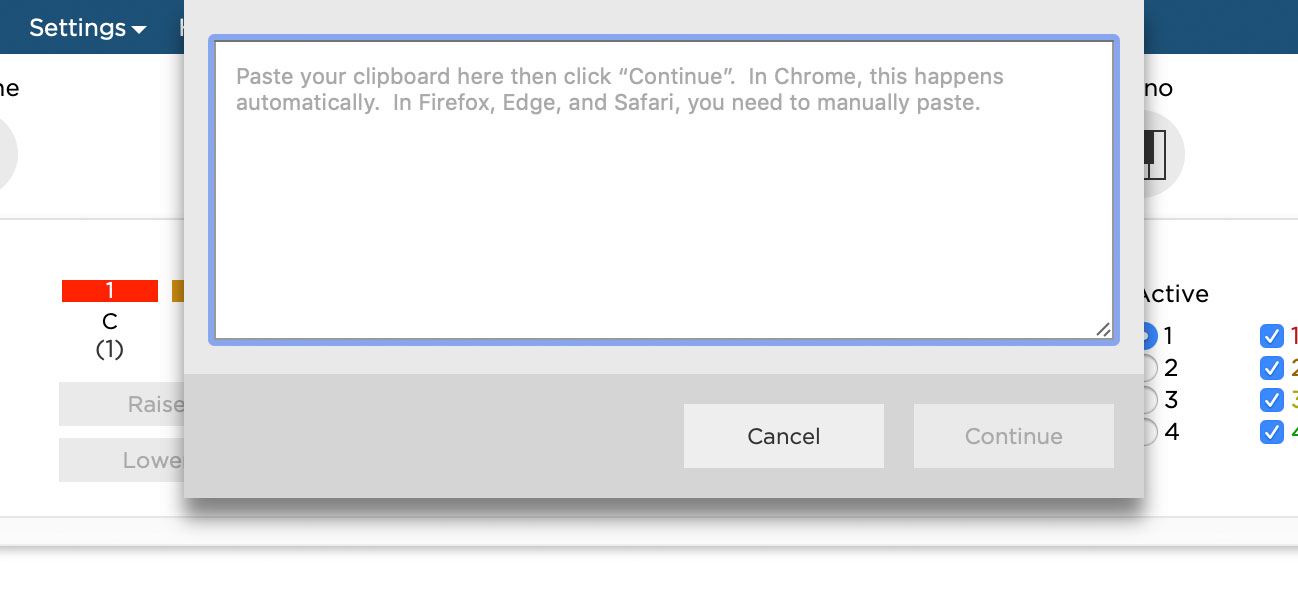
In Chrome, the “Paste From Clipboard” action automatically grabs the content from your OS clipboard and pastes it at the location of the cursor. If using Firefox, Edge, or Safari, Hookpad provides a text area for you to manually paste your clipboard content (⌘C on macOS; Ctrl+C on Windows; or right-click → paste) and then inserts it at the location of the cursor.
Hookpad data is copied to the clipboard as a JSON string. Example:
{"notes":[{"sd":"1","octave":0,"beat":1,"duration":1,"isRest":false},{"sd":"2","octave":0,"beat":2,"duration":1,"isRest":false},{"sd":"3","octave":0,"beat":3,"duration":1,"isRest":false},{"sd":"4","octave":0,"beat":4,"duration":1,"isRest":false}],"chords":[],"fp":"0c473788381478f815d29b689f7d3f83931b7bc9"}Keyboard shortcuts also work with command ⌘ (macOS) and ctrl (Windows), e.g., ⌘c for copy on macOS.
Note Pitch
To change the pitch of a note, drag it up or down with the mouse or select it (it will light up) and then use the up/down arrow keys or the raise/lower buttons in the note GUI. You can also hold up/down as you type 1-7 to enter a note one octave higher/lower. The advanced topics section of this guide discusses how to add non-diatonic notes.
Note Octave
By default, new notes are placed in the octave that minimizes the distance from the previous note. If you want Hookpad to place new notes in the same octave as the previous note, you can toggle the "Smart Octave" setting in the "Settings" menu. Turning Smart Octave to off will cause new notes to be placed in the same octave as their neighbor (unless up/down is held to override).
Five octaves are supported. To change the octave of a note, click the note (it will light up) and:
- Use the up/down arrow keys to move it through the scale into a higher/lower octave.
- Hold shift and click the up/down arrow keys to move the note an entire octave.
- You can also hold up/down as you type 1-7 to enter a note one octave higher/lower.
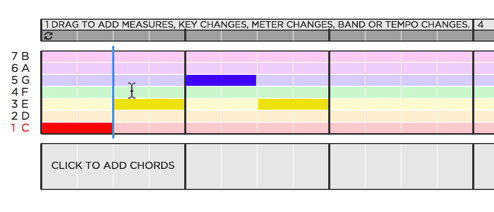
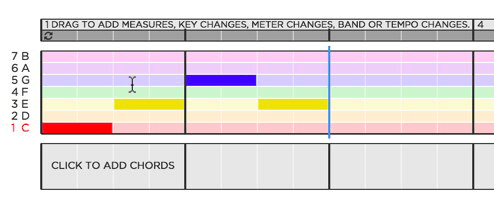
Note Duration
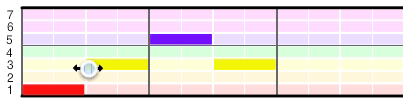
To resize a note, hover the mouse over its edge, click, and drag right or left. Notes have two regions that have slightly different behaviors: an "outer" edge and an "inner" edge. You can tell which region you are in by the icon of the mouse.
- If you drag from the outer region, the neighboring note is connected and will shrink and grow along with the note you are dragging.
- If you drag from the inner region the neighboring note is not connected and will be consumed by the note you are dragging.
- In "Text" entry mode only (See the advanced section below), the entire row of notes can be made to shift together with the drag. To push/pull all following notes, hold alt/option as you drag
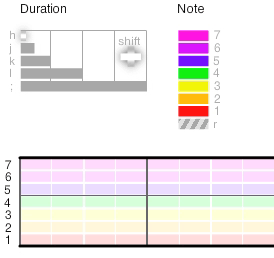
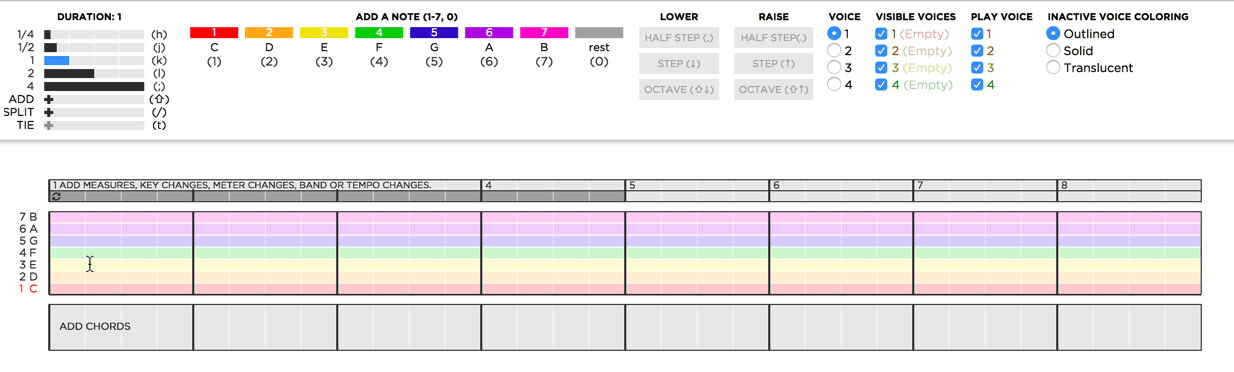
Use keyboard shortcuts h, j, k, l, ;, ', b to change the duration as you enter notes or chords (the number of available durations depends on the current Meter. For example, in 12 beats per measure all options are available. In 4 beats per measure, only h,j,k.l,; are). You can also click on a duration to select the desired number of beats.
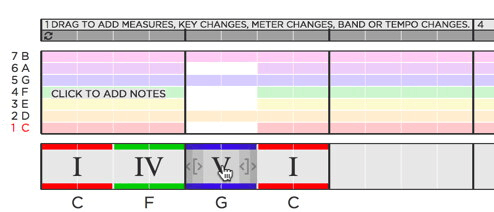
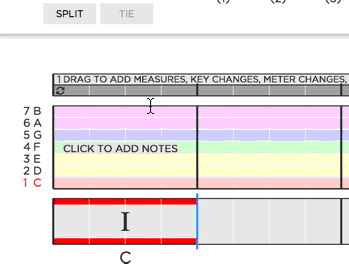
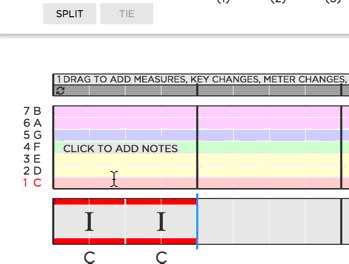
Splitting Notes
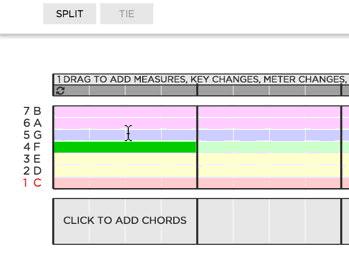
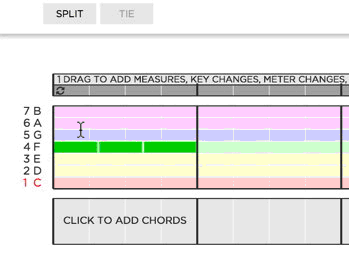
To split a note, click the “Split” button or type the “/” key to toggle split mode. The mouse icon will turn into a vertical bar, like this: |. While the mouse icon is a vertical bar, click where you want to split.
Tying (Joining) Notes
To tie or join two notes together, select the notes you would like to tie, and click the “Tie” button or press the “t” key. Tying only works on adjacent notes that have the same pitch.
Non-Diatonic Notes
To raise or lower a melody note by a half step, select the note and press “.” (period) or “,” (comma) respectively. For example, to raise scale degree 4 to 4♯, select it and press “.”.
You can also hold "." or "," as you are entering a note. Doing so will cause the note to be entered a half step lower or higher than it otherwise would have been.
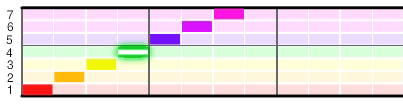
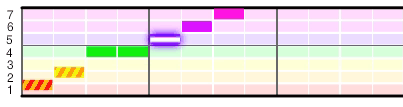
Voices (Multiple Melodies)
Hookpad supports four melody voices (Hookpad supports only one melody voice). Each voice has its own lyrics and is configurable in the Bands tool with its own instrument(s), octave, and volume. Notes are entered into the voice in the note GUI, as shown below.
The active voice can be changed with a keyboard shortcut:
- ctrl + 1 → voice 1
- ctrl + 2 → voice 2
- ctrl + 3 → voice 3
- ctrl + 4 → voice 4
Inactive voices can be displayed with one of three coloring options, configurable in the “settings” panel or with the keyboard shortcut ` (backtick)
 Translucent (default)
 Solid
Solid
 Outline by voice
For the “outline by voice” option, voice 1 has a red outline; voice 2 has an orange outline; voice 3 has a yellow outline; voice 4 has a green outline.
Triplets
To Create triplets, select a quarter note or half note, then click “Make Triplet”. This splits the note into three equal triplet notes.
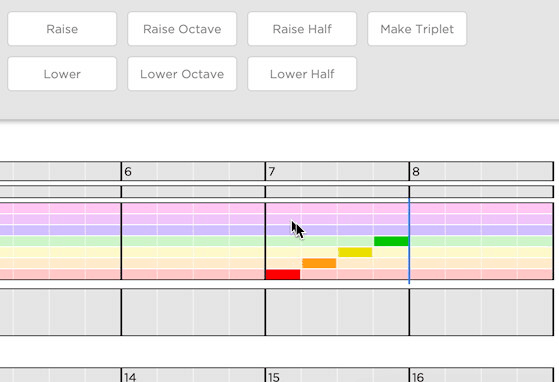
Triplet options
You can create eighth-note triplets (from a quarter note) or quarter-note triplets (from a half note).
Please note: Sixteenth-note triplets are not supported, as they would be too small to see and select properly on Hookpad’s grid.
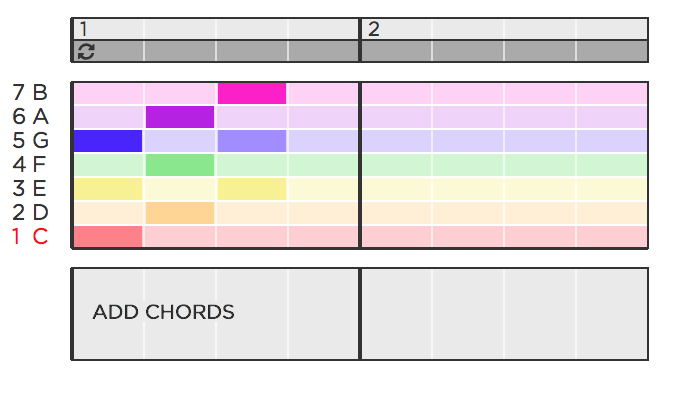
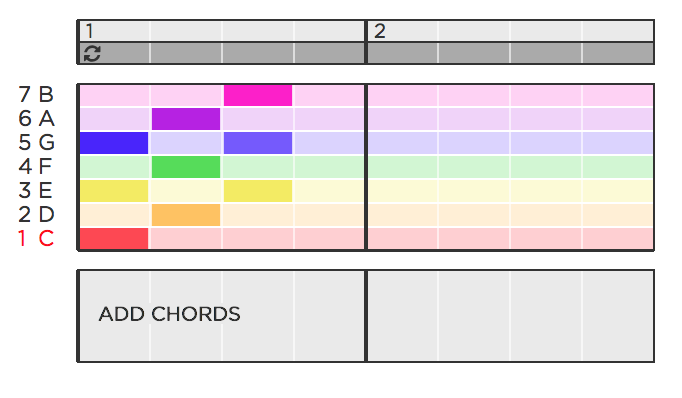
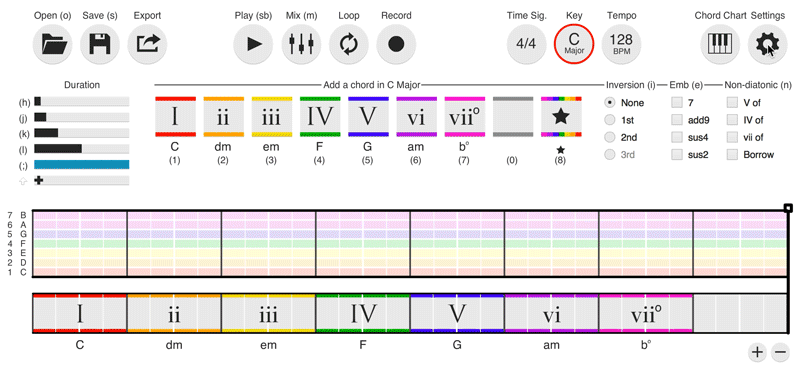
Chords
Adding / Deleting Chords
To add chords, click in the chord staff and type the numbers 1-7 for the seven chords formed by notes in the scale (major by default). Type delete/backspace to delete chords, just like you would in a text editor.
Selecting Chords
Select multiple chords as you would in a text editor:
- Draw a selection bar.
- Selection bars can be created by starting a drag in an empty part of the staff or along the top/bottom edge of a chord (dragging from the middle of the chord will move it over left/right).
- Command/control-click and shift-click are supported.
- Hold shift and use the left/right arrow keys to select the chord on the left/right of the cursor
Copying & Pasting Chords
Within the Same Project
- Select some chords
- Use the keyboard shortcut “c” to copy the selection to the clipboard. Alternatively, use Edit → Copy.
- Place the cursor at the desired insertion point
- Use the keyboard shortcut “v” to paste. Alternatively, use Edit → Paste.
Between Different Projects
- In project A: select some chords
- In project A: use the keyboard shortcut “c” to copy the selection to the clipboard. Alternatively, use Edit → Copy
- In project B: place the cursor at the desired insertion point
- In project B: use Edit → “Paste From Clipboard”
In Chrome, the “Paste From Clipboard” action automatically grabs the content from your OS clipboard and pastes it at the location of the cursor. If using Firefox, Edge, or Safari, Hookpad provides a text area for you to manually paste your clipboard content (⌘C on macOS; Ctrl+C on Windows; or right-click → paste) and then inserts it at the location of the cursor.
Hookpad data is copied to the clipboard as a JSON string. Example:
{"chords":[{"sd":"1","octave":0,"beat":1,"duration":1,"isRest":false},{"sd":"2","octave":0,"beat":2,"duration":1,"isRest":false},{"sd":"3","octave":0,"beat":3,"duration":1,"isRest":false},{"sd":"4","octave":0,"beat":4,"duration":1,"isRest":false}],"chords":[],"fp":"0c473788381478f815d29b689f7d3f83931b7bc9"}Keyboard shortcuts also work with command ⌘ (macOS) and ctrl (Windows), e.g., ⌘c for copy on macOS.
Chord Duration
To resize a chord, hover the mouse over its edge, click, and drag right or left. Chords have two regions that have slightly different behaviors: an "outer" edge and an "inner" edge. You can tell which region you are in by the icon of the mouse.
- If you drag from the outer region, the neighboring chord is connected and will shrink and grow along with the chord you are dragging.
- If you drag from the inner region the neighboring chord is not connected and will be consumed by the chord you are dragging.
- In "Text" entry mode only (See the advanced section below), the entire row of chords can be made to shift together with the drag. To push/pull all following chords, hold alt/option as you drag
- Chord duration changes work the same way as notes. You can find animations of the above behavior in the equivalent notes section of this manual.
Use keyboard shortcuts h, j, k, l, ;, ', b to change the duration as you enter chords (the number of available durations depends on the current Meter. For example, in 12 beats per measure all options are available. In 4 beats per measure, only h,j,k.l,; are). You can also click on a duration to select the desired number of beats.
Splitting Chords
To split a chord, tap the “/” key to toggle split mode. The mouse icon will turn into a vertical bar, like this: |. While the mouse icon is a vertical bar, click where you want to split.
Tying (Joining) Chords
To tie or join two notes together, select the chords you would like to tie, and press the “Tie” button or press the “t” key. Tying only works on adjacent chords that have the same root.
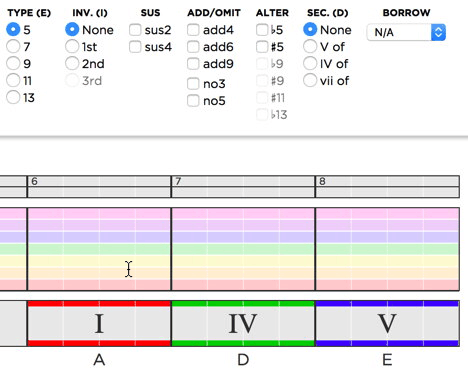
Chord Inversions
To invert a chord, select it and click the radio button corresponding to the desired inversion. Note that if a chord is a 7 chord, a fourth option (3rd inversion) becomes available. Inversions can be cycled using the “i” shortcut.
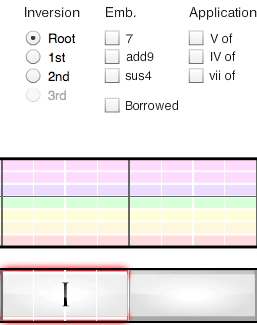
Inversion Notation Conventions:
Inversions are notated using figured bass (one or two numbers to the right of the chord Roman numeral) according to classical music conventions:
(no figured bass) | Chord in root position |
6 | Chord in 1st inversion. |
64 | Chord in 2nd inversion. |
7 | 7 Chord in root position. |
65 | 7 Chord in 1st inversion. |
43 | 7 Chord in 2nd inversion. |
42 | 7 Chord in 3rd inversion. |
Chord Embellishments
To embellish a chord with a suspension, add9, or change it to a 7 chord, select a chord and check the appropriate checkboxes from the chord palette. When no chord is selected, embellishments will be applied to the next entered chord. You may alternatively press the “e” shortcut to cycle through all possible combinations of embellishments.
Magic Chord and Magic Bass
One of the ways that Hookpad can simplify songwriting is by helping you choose chords that sound good together. Magic Chord lets you ask Hookpad what it thinks is the best chord to use in a given situation. Hookpad will analyze the chords you’ve already written and then look for examples of songs in the TheoryTab library that have used chords similarly to get clues as to what chord might work best next. Then it provides suggestions for you to pick from.
Using Magic Chord is simple. Place your cursor in your song where you would like a chord recommendation. Then click on the Magic Chord icon in the chord gui. A list of recommended chords will appear. The chords are listed in order of most commonly found in the TheoryTab database (which is what the AI learns from to make its predictions).
Other Smart Chord Options
Popular Chords are a list of the most popular chords in your key according to the Theorytab Database
Search let you find chords by name
Tone sets let you find chords with specific combinations of notes in it
Bass Sets is similar to magic chord but it acts on an existing chord to tell you other alternatives that use that same bass note.
Progressions lets you drop common progressions into your song.
Non-Diatonic Chords
There are two ways to add non-diatonic chords to your project: “borrowed” chords and “secondary” chords.
Borrowed Chords
Borrowed chords refer to chords whose root and quality are defined by a parallel mode. For example, in the key of C major, the ii chord has a minor quality. In the key of C Minor (the parallel minor mode), the ii° chord has a diminished quality. If you want to use a diminished ii° chord while you are composing in the major mode, you can temporarily “borrow” from the minor mode.
To create a borrowed chord, select a chord, and choose the desired mode from the dropdown menu in the chord GUI. Choosing a borrowed mode when no chord is selected will apply it to the next entered chord.
Secondary Chords
Secondary (or Applied) chords allow you to briefly tonicize a different chord. Supported applied chords include secondary dominant (V of), secondary leading-tone (vii° of), and secondary sub-dominant (IV of) chords. Select the applied chord checkbox you wish to add, then add the chord to which it is applied. For example, to make a V/ii chord, select “V of,” then add a ii chord.
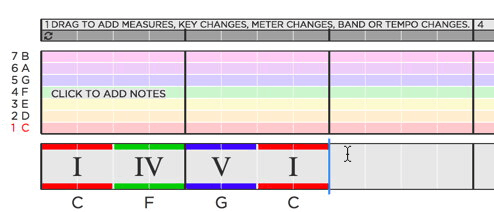
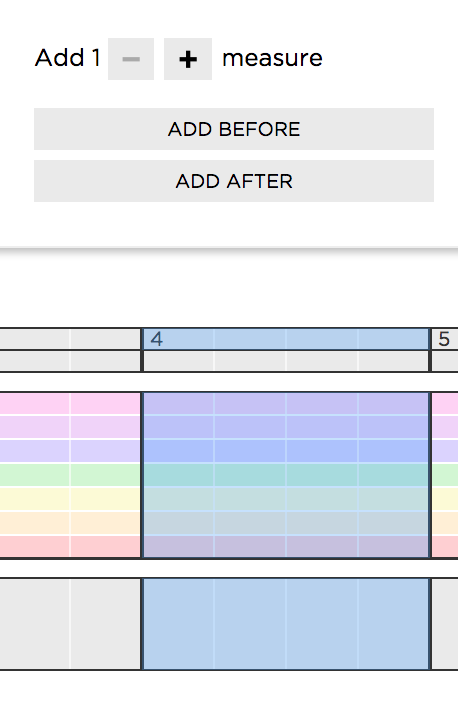
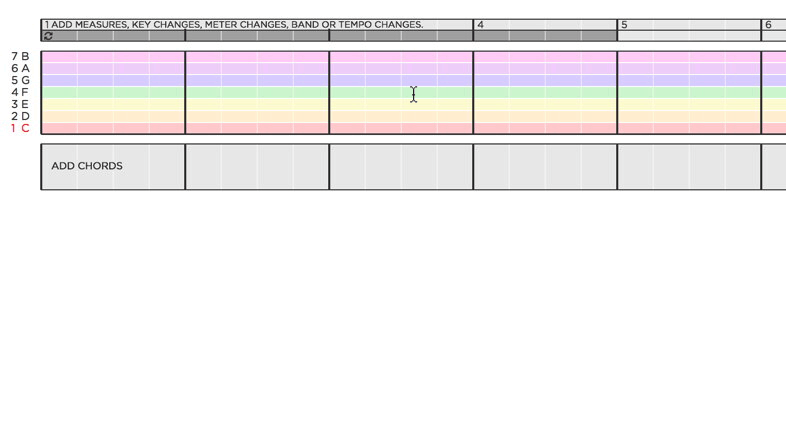
Measures
- More time will be added to your song automatically as your music gets to the end of the available space.
- To add measures in the middle of your song by selecting the measure at which you want to add time and choosing “Add Measures.” To select a measure, click on the measure bar above the melody staff.
- You can also select multiple measures and remove them.
Changing Key / Scale
By default, new projects are in the key of C Major. To change the key, click on the key menu and choose a different tonic or scale.
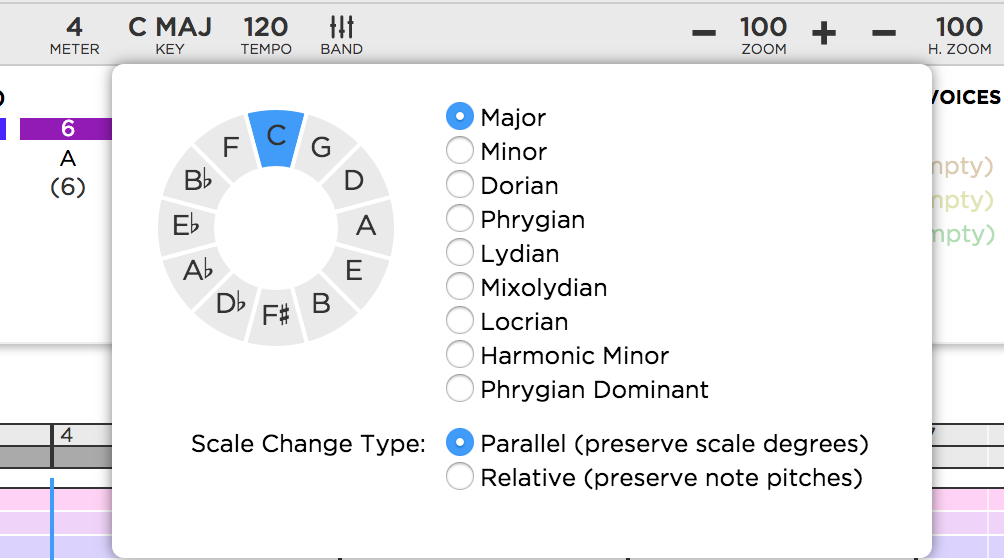
Hookpad allows you to have key changes in your project. Add a key change by selecting the measure you would like to add the key change to and click “add key change.”
Scales
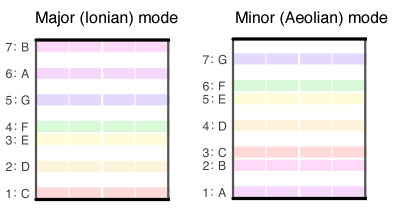
To change the scale of the project, click the key menu (if your song only has one key) or select one of the key change flags that you want to change. Choose the scale you want from the available options. Hookpad supports composition in Major, Minor, Dorian, Phrygian, Lydian, Mixolydian and Locrian scales (which are permutations of the major scale) as well as the Harmonic Minor scale and Phrygian Dominant scale.
Scale Transposition
When the scale of a project is changed, the key can change in one of two ways: relative transposition or parallel transposition. This option is configurable when changing the scale.
Parallel transpositions (default)
Parallel scale transpositions preserve the starting note between the original and transposed keys. During a parallel transposition, notes and chords will keep their same scale degrees and chord numbers, but the pitches may change to reflect the new mode. For example, a C chord (I) in C Major will become a Cm chord (i) in C minor.Relative Transpositions
In a relative transposition, the new key tonic has a fixed relationship with the current key tonic, which depends on the original scale and the new scale. For example, a project in C Major making a relative transposition to the minor scale requires that the new key tonic be A since C Major and A Minor are relative keys. During a relative transposition, notes and chords will keep their same pitches, but the scale degree and chord numbers will change to reflect the new scale. For example, a C chord (I) in C Major will become a C chord (III) in A minor. When the "Scale Change Type" is set to "Relative," the key tonic dropdown will be greyed out since and the key tonic will be selected automatically depending on the scale change.Changing Meter (Time Signature)
Hookpad allows you to change the meter your song is in. From the Meter menu, click the number of beats per measure you would like to use, and a new project will be loaded with this number of beats. Complex meters (3, 6, 9, and 12 beats per measure) with a triplet feel can have three beats felt as one. In these meters, a “beat unit” option is available for this purpose and will be visible in the meter menu when relevant. Setting the beat unit to three will cause three beats to be felt as one. The tempo (see below) used for playback speed will respect this choice so playback will increase by a factor of three.
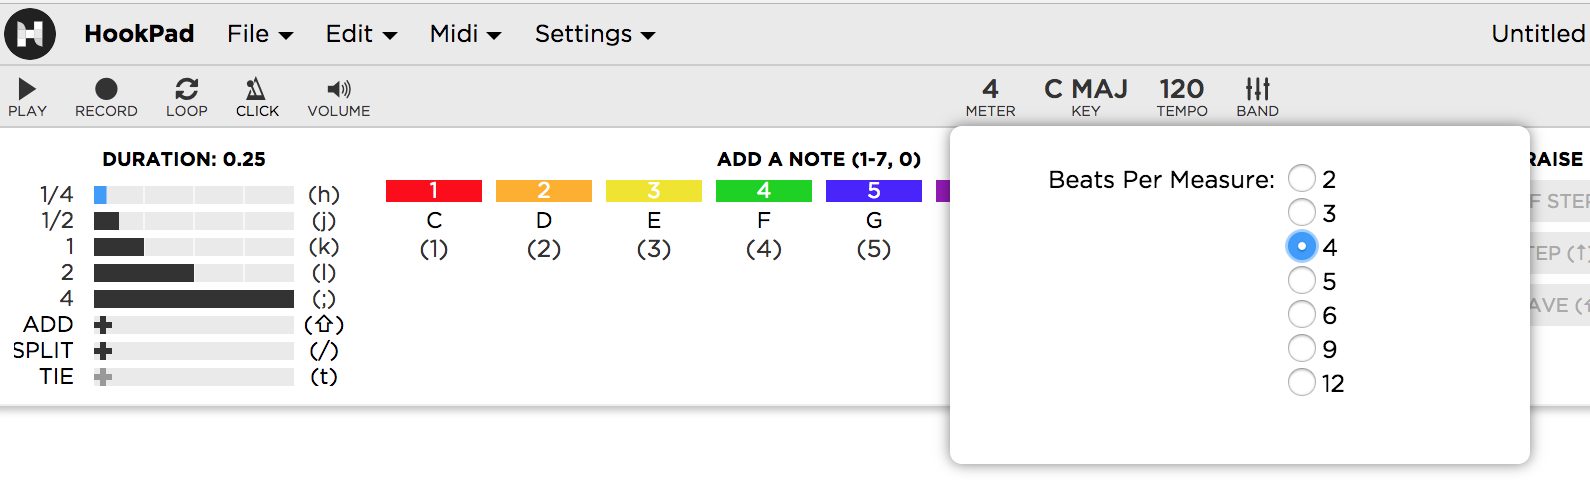
Hookpad allows a song to have multiple meters. If you would like to add a meter, select the measure at which you would like to add a meter change. Choose the option to add a meter change from the GUI and click ok.
When adding a new meter, there are options available for how long the new meter change will last. You select a range of measures, have it last until the next meter change (if applicable), or through the end of the song.
When there are multiple meters in a song, flags are added at each meter change. You can select a flag by clicking on it. Doing so will allow you to change the meter of that flag or to remove it (with the delete key)

Changing Tempo
Click on the tempo button to bring up the tempo dialog. To change the tempo of your song, drag the tempo slider to the desired value. You may also set a tempo by tapping a key on your keyboard. Click “Tap Tempo,” then tap the ‘q’ key on your keyboard at regular intervals and Hookpad will automatically compute the tempo. You can also give your song a swing feel by checking the “swing time” box. Tempo changes can be added just like key and meter changes through the measure selection GUI (see above).
Changing Sounds / Instruments
Hookpad lets you customize the collection of instruments that play your music. You can also adjust the volume and the center of the voicing range for each instrument in the band. In the free version of Hookpad, users can try out this feature, but all bands will revert to the default band when the project is saved.
To edit the arrangement of your project, press the "Band" menu.
When the arrangement tool opens, you will see three lists: templates (left), tracks (center), and samples (right). The “tracks” list will be described first, followed by a description of the “templates” list.

Tracks
The center “tracks” list contains the collection of instruments that play each component of your song (lead/melody, harmony/chords, bass, and percussion). Each track has four properties:- type: specifies the part of the song that the track plays. Type can be one of four values:
- “lead1, lead2, lead3, lead4” - the melody in each of the four voices
- “harmony” - the chord progression defined in the chord region
- “bass” - the bass of the chord defined the chord region
- “drums”
- sound: the name of the instrument/sound sample used by the track
- volume: the volume of the track
- octave: the tonal center of the track. For example, to lower the bass line, change the octave property of a “bass” track to a negative value.
Adding a Track
To add a new track to the arrangement, click the "Add Track" icon at the top of the “Band Tracks” list and select a track type (lead, harmony, bass, drums) from the menu. The track will be added with default values for the sample, volume, and octave.
Removing a Track
To delete/remove a track from the arrangement, click the "X" icon to the right of that track
Change the Instrument/Sample of a Track
To change the instrument/sample that a track uses, select the track, then select a different sample from the sounds list on the right.
- Selecting a track highlights the track and also highlights the sample it uses in the sounds list (right).
- The sounds list is “type-aware” and updates to show the available samples for the type of the active track.
Change the Volume of a Track
To change the volume of a track, select the track and slide the volume slider. You can also mute or un-mute a track, by clicking the icon on the track.
Change the Octave of a Track (non-drum tracks)
To change the octave of a track, select the track and slide the octave slider. The octave slider on melody tracks can be adjusted to discrete values of 1 or -1, which causes playback to be an octave above or below the default octave. The octave slider on harmony and bass tracks are continuous and represent the center of the voicing in units of octaves. More information on how the voicing algorithm uses the octave slider values can be found in the playback section.
Templates / Saving
Band templates allow you to quickly apply a saved band to your project. Hookpad provides built-in templates to showcase the types of sounds that are possible and you can also save your own arrangements as templates.
Saving a Template
To save the current band mix as a template for later use, click the “save as template” button above the band tool. In the menu that appears, type a name, and click “save as.” Your mix will now appear on the “templates” list on the left every time you use Hookpad.
Applying a template to a project
To apply a template to your project, select it from the list. A confirmation dialog will ask you if you are sure you want to apply the new band to your song. Your current band will always be discarded when you do this so make sure to save it first if you think you may want to restore it.
Just as with key, meter, and tempo, you can change the instrumentation of your song by adding a band change by selecting the measure at which you want the change to occur and choosing the "Add Band Change" option. Band Change flags will appear at every change. Clicking on any of these flags allows you to edit that band.
Playback
Hookpad uses the notes and chords from your project in conjunction with the instruments specified in the band tool to create a musical performance. There are seven playback channels, one for each of the four melody voices, one for harmony, one for bass, and one for drums. Instruments for the melody voices are specified by the lead tracks in the band tool, where lead1 corresponds to melody voice 1, lead2 corresponds to melody voice 2, and so on. Harmony, bass, and drum instruments are assigned in a similar manner.
Each playback channel can be individually muted by clicking on the volume icon in the menu bar and unticking the corresponding playback channel. The playback of melody channels can additionally be controlled in the melody GUI in the Play Voice section.
Harmony playback
Hookpad generates a performance from your chord progression for each harmony track specified in the band. The rhythm of the chords played, as well as the order and distribution of pitches (the voicing of the chords), are chosen automatically for you depending on the specified harmony track. For example, the track Piano RH 1/4s (the default harmony voicing) plays piano chords in right-hand closed position every beat. Some tracks, like Bossa Piano, play specific rhythms depending on the meter of your song, in this case, a Bossa Nova style piano.
Many harmony tracks use 3-note voicing, meaning that chords are played using three notes only. For seventh chords, extended chords, and any chord that requires more than three notes, the bass note will be left out of the voicing. This is done to make playback sound more realistic, as it reduces the number of treble notes, which can sometimes clutter up the sound. Therefore, it is important to always add a bass track if you want playback to contain bass notes, as well as proper inversions of the chord.
The voicing range of pitches in each chord can be adjusted using the octave slider. Hookpad’s voicing algorithm tries to keep the notes in the chord centered around the value specified by this slider. Moving the slider a fraction of an octave up or down will correspond to a chord being voiced up or down by that same amount. For example, if the default voicing for a C major chord is C, E, G, then moving the octave slider up by 1/3 octave will cause the chord to be voiced as E, G, C.
Guitar tracks
Guitar tracks are voiced differently than non-guitar tracks. Hookpad does its best to play guitar chords as they would sound on a real guitar. For acoustic and clean electric guitar tracks, Hookpad attempts to play the chord in open position. If no common open position fingering is found, Hookpad will barre the chord using either E-barre or A-barre patterns, preferentially choosing the barre position that minimizes the barre fret number.
High gain or distortion guitar tracks are played as 2-string power chords in either E-barre or A-barre positions, preferentially choosing the barre position that minimizes the barre fret number. Inverted chords or chords that do not contain the fifth are voiced by their first interval rather than as a fifth built from the root. For instance, a G/B chord is voiced as B - G, rather than B - F#.
Bass playback
Like the harmony tracks, Hookpad creates bass lines from the chord progression for each bass track specified in the band tool. The bass line rhythm and pitches are chosen automatically for you depending on the specified bass track. For example, the track Piano Bass Dotted (the default bass voicing), plays a dotted rhythm on a single note given by the corresponding chord bass. Some tracks, like Bossa Bass, play a specific bass line that uses multiple chord tones. Like harmony tracks, the bass track rhythms will change depending on the meter of the section.
Drum playback
Unlike harmony and bass tracks, drum tracks play throughout the duration of the band region, regardless of whether there is a chord progression or not. Drum tracks can be classified as one of four types: Basic drums, Regular drums, Breaks, and Pickups.
Basic Drums
Basic drum tracks are all found in the Basic drums folder. Basic drums play the same rhythm in each measure of the band region (except Basic Latin, which alternates between two rhythms).Regular Drums
Regular drum consist of all drum tracks not in the Basic drums or Pickups folders, and those not explicitly labeled as break patterns (most of the drums). Regular drums each contain four different rhythmic patterns: Start rhythm, basic rhythm, fill 1, and fill 2. Each region will begin with the start rhythm (for example, a cymbal crash), continue with the basic rhythm, and end with a fill rhythm. If the band region is longer than 8 measures, then a fill rhythm will occur at the end of every 8th measure, alternating between fill 1 and fill 2.Breaks
Breaks can be found at the end of each drum folder. Breaks usually represent a single drum hit and are designed to conclude a preceding drum region. For example, if region 1 contains a rock drum (e.g., Rock Simple 1), you could add Rock Break to region 2 to smoothly transition into a section of your song that no longer has drums.Pickups
Choosing a pickup will tell Hookpad to play an appropriate pickup drum rhythm to the drums specified in the subsequent section. For example, if region 2 contains a rock drum, and region 1 contains Smart Pickup Simple, then at the end of region 1, Hookpad will play a pickup rhythm that smoothly transitions into the rock drums of region 2.Audio Tracks
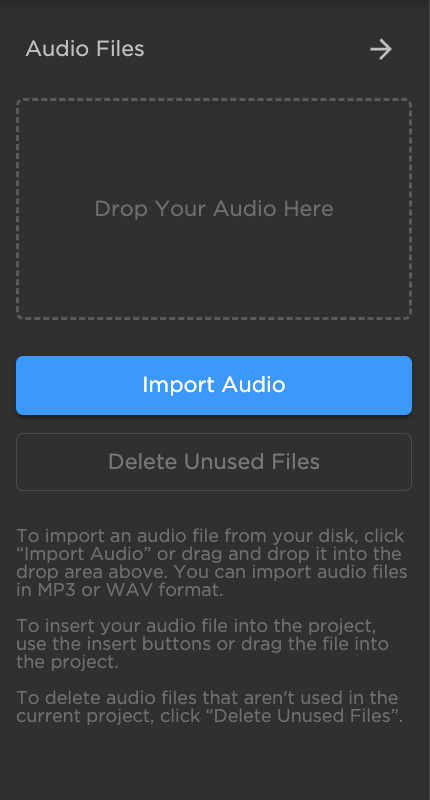
Hookpad allows you to import and work with audio files (WAV or MP3) in your projects. You can upload audio tracks, sync them with your project's tempo, and adjust them using various controls.
Uploading your Audio Track
Click on the "Audio Track" icon in the header to open the audio track UI. You can also go to File > Import Audio File.

A panel on the right side of Hookpad will appear where you can import your audio files (WAV or MP3). You can come back to this panel anytime to upload or delete audio files.
Setting BPM and Tempo
After uploading, you'll be prompted about the BPM and tempo of your audio track.
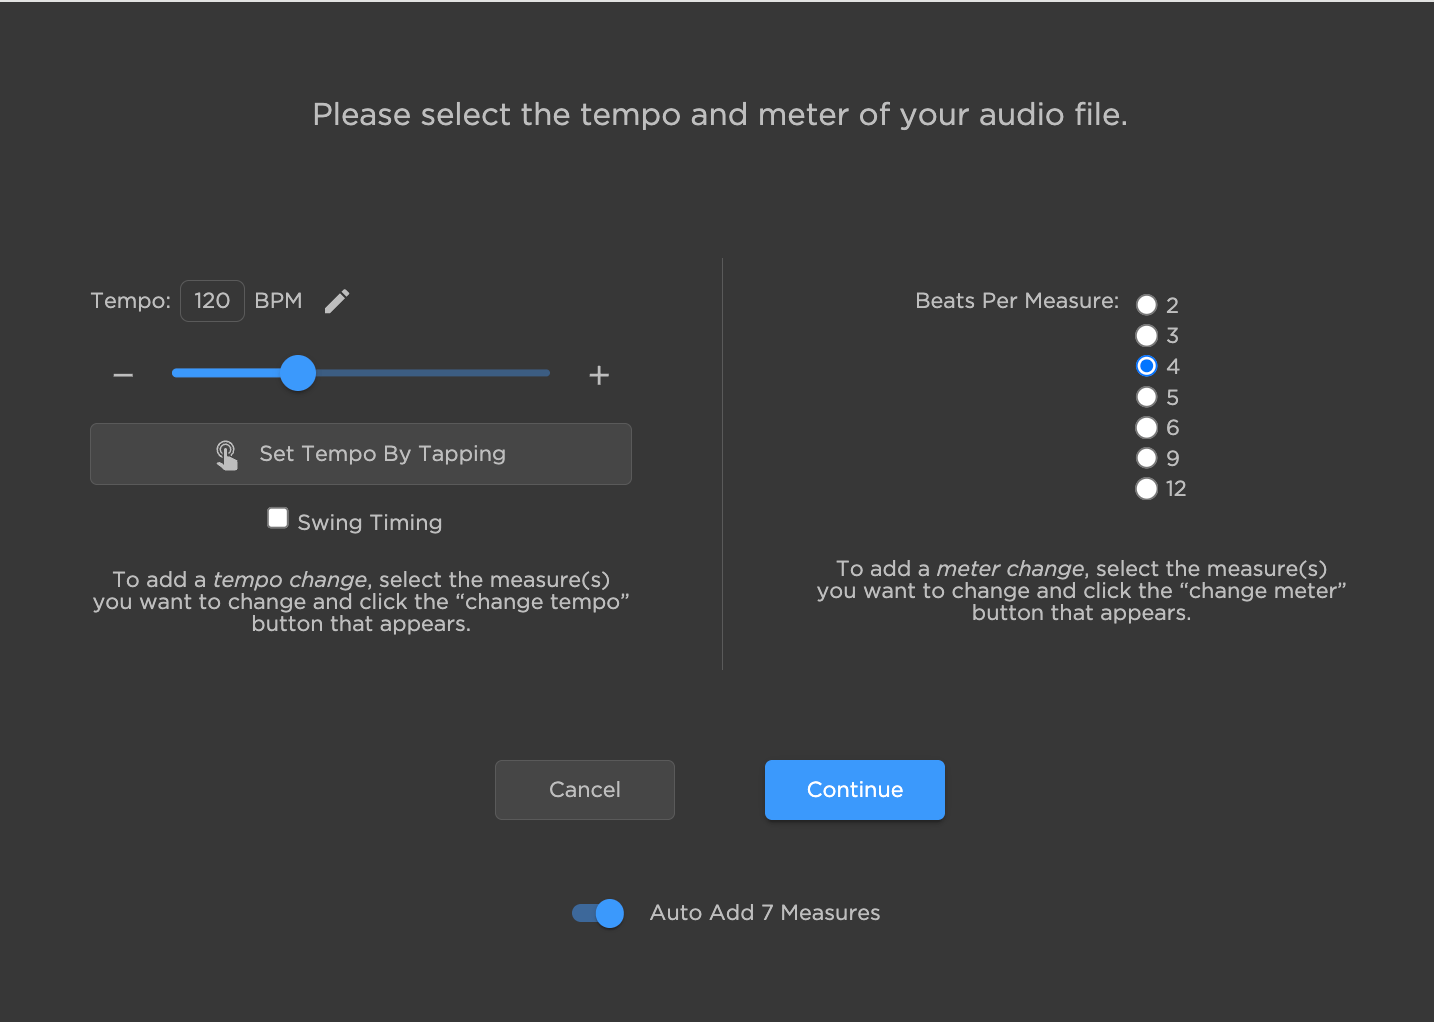
You will be writing music in Hookpad over this audiotrack so Hookpad needs to know what is going on musically in your external audio or the music your write in Hookpad won't line up with the music in your external track. If you don't know your track's BPM, you can select "Set Tempo By Tapping" and hit the "Q" button on your keyboard while your track plays to find your BPM. Once you have the BPM of your project matching the BPM of the audio track you should also adjust the key of your project to match the key of your audio track as well.
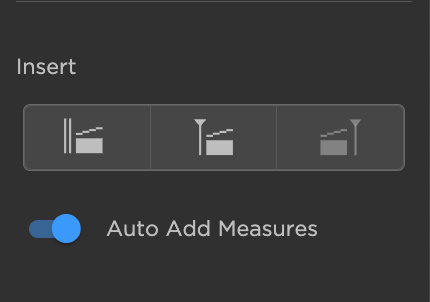
Once you have uploaded your track you can drag it into your song's audiotrack staff. You can also use the insert buttons to specify where you want the audio to go. There are three options:
- 1) At the beginning of the project
- 2) At the cursor position
- 3) After the project (at the end of an existing audio track)
Adjusting your Audio Track
Now that your audio track is in the Hookpad project, you can adjust positioning so it starts and ends where you want it to line up with your music. This can be done by dragging it and resizing it much like you would with a note or chord.
Positioning and Resizing
To expand the length of your audiotrack drag the lower corner left/or right.

To loop your audiotrack drag the upper corner left/or right.

Audio Track Controls
The navigation bar provides the following controls:

- Zoom: Allows you to make the container of the audio larger or smaller
- Waveform Zoom: Allows you to make the waveform visualization (inside the container) bigger or smaller for visibility
- Audio Clip Offset: Allows you to adjust the timing/sync your track with its container
- Audio Clip Volume: Makes the track louder or softer
- Mute: Mutes audio track
- Solo: Soloes audio track
- Loop: Allows you to loop the selected audio track
- Split: Allows you to cut/adjust audio files
- Delete: Deletes selected audio clip
Select "Play" (or press space bar) at the top left corner to hear your track. Select "Click" to enable a click track.
Exporting
Exporting as a Score (Sheet Music)
The score export option creates a PDF of your song in conventional sheet music notation. The score will contain one stave for melody and two staves for voiced harmony. Exporting to score respects enharmonics, e.g., in the key of C, 2♯ will be notated as D♯ rather than E♭.
To export the entire project, go to File → Export → Score. To export a portion of the project, select the desired measures, and, from the measure change GUI (not the file menu), click Export button → Score.
Exporting as a Guitar Tab
The tab export option creates a PDF of your song notated in guitar tablature, complete with fingerings for chords and melody.
Exporting as a Lead Sheet
To export the entire project, go to File → Export → Lead Sheet. To export a portion of the project, select the desired measures, and, from the measure change GUI (not the file menu), click Export button → Lead.
Exporting MIDI
Hookpad can export a MIDI file (format 1) suitible for importing into any digital audio workstation like Garage Band, Logic, or Pro Tools, or into notation software like Finale or Sibelius. The exported MIDI file contains a track for every track in your Hookpad mix, complete with volume and octave information.
To export the entire project, go to File → Export → MIDI. To export a portion of the project, select the desired measures, and from the measure change GUI (not the File menu), click Export button → MIDI.
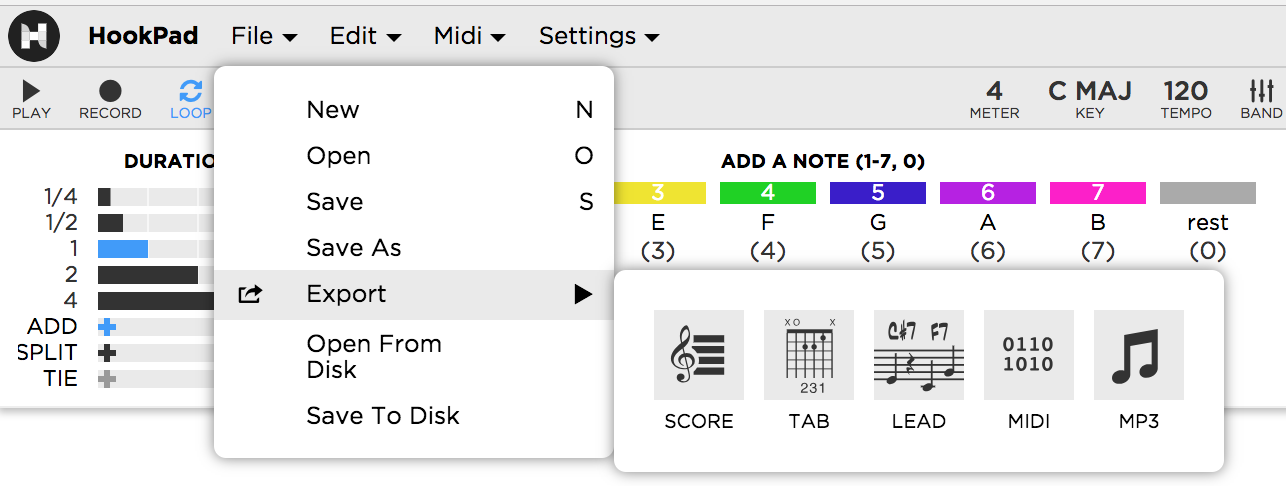
Exporting MP3
To export the entire project, go to File → Export → MP3. To export a portion of the project, select the desired measures and click Export → MP3.
Settings / Options
Entry Mode
By default, notes will overwrite existing notes rather than shifting those notes over. This is referred to as Table mode. You can switch the entry mode to behave more like a word processor by clicking the button in the upper right hand corner. This will switch the mode to “Text” entry mode. In this mode, notes shift over to make room for new ones. In table mode, the cursor can be placed anywhere and there can be gaps between neighboring notes. In "text" mode, gaps can't exist (because notes shift over to fill empty space just as words to do in a text editor). Switching to Text mode will fill any gaps in your music with rests to preserve the current rhythmic spacing.
Primary Labels
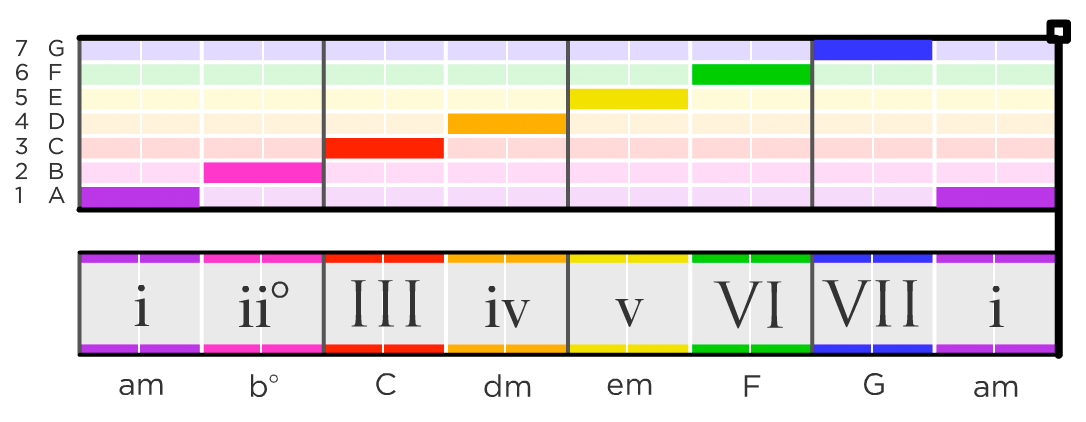
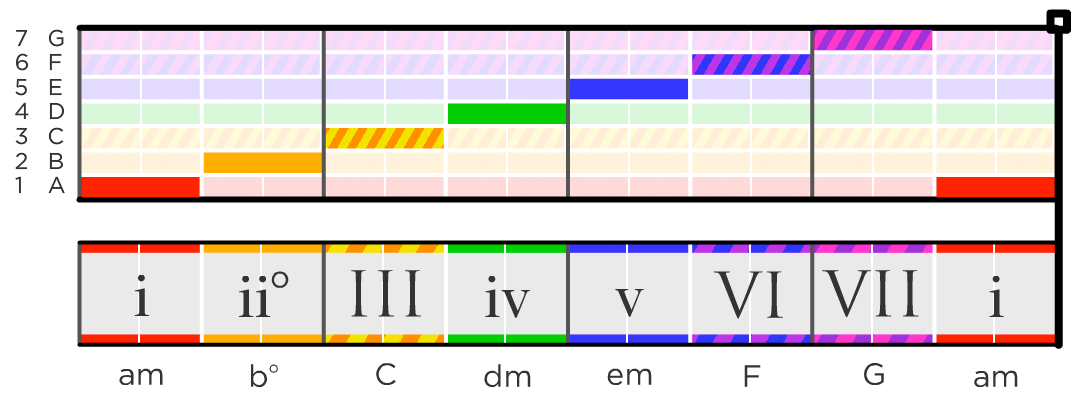
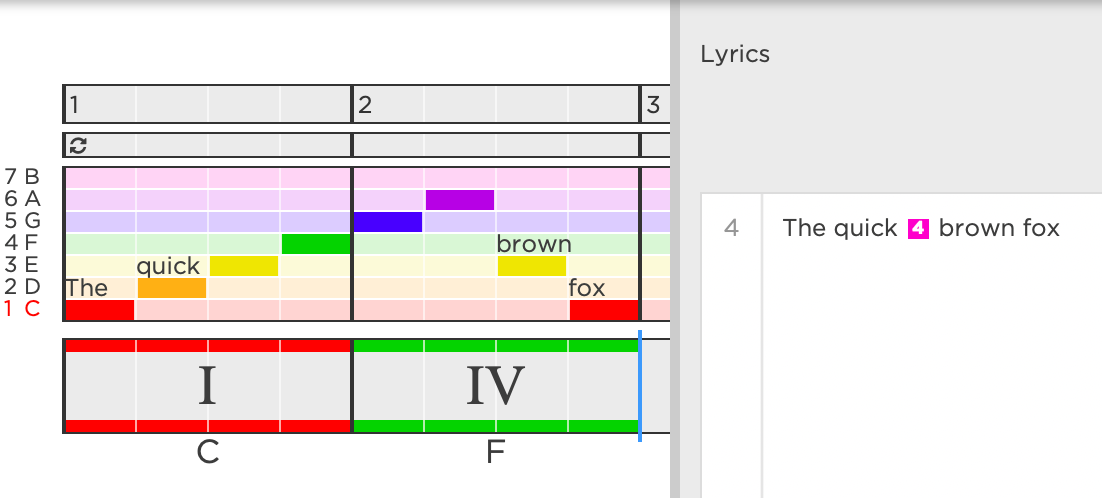
By default, Roman numerals (for example, I, ii, iii) are the primary label on chords, and absolute or “in-key” chord names (for example, C, dm, em) are shown as a secondary, less prominent label below the chord. This convention can be reversed in Hookpad’s settings panel, as shown below.
Color Scheme
Hookpad colors notes and chords according to their position in the scale. You can configure the Hookpad color scheme in one of 2 ways (These options can be found in the settings menu)
Diatonic-Centric Colors (Default)
Hookpad colors scale degrees 1, 2, 3, 4, 5, 6, and 7, and chords I, ii, iii, IV, V, vi, and vii° as red, orange, yellow, green, blue, purple, pink, in the major scale. When switching to a different scale, the color order is maintained, but the colors are cycled so that both the intervals between note colors and the quality of chord colors are preserved. For example, the distance between a red scale degree and a yellow scale degree is the same in every scale, and the basic red and yellow chords have a major and minor quality, respectively, in every scale. This also indicates the relative relationship between the scales (e.g. A minor is the purple chord in the key of C major and it remains the purple chord in the key of C major. The only difference is that it went from being the vi chord to the i chord (A minor is the relative minor of C Major)
Major-Centric colors:
Hookpad colors scale degrees 1-7 and the corresponding chords based on how each note pitch and chord root pitch relates to the major scale. For example, in the minor scale, scale degree 3 is a half step lower than scale degree 3 of the major scale, and so it is colored yellow and orange to indicate that its pitch is halfway between scale degrees 2 and 3 of the major scale. This color scheme echoes the “popular-style” note and chord labeling whereby accidentals are used to denote deviations of notes and chords from their major scale counterparts.
The following images show a song in the minor scale with each color scheme.
Diatonic-Centric Colors
Major Scale-Centric Colors
Chord Compatibility Guides
Once you've chosen some chords, Hookpad can help you pick notes for your melody by highlighting the notes that are in the chords you've written. That way you can see immediately which notes will sound more stable (the colored notes, as shown below) and which notes will create a more dissonant sound (the white notes).

Smart Octave
By default, new notes are placed in the octave that minimizes the distance from the previous note. If you want Hookpad to place new notes in the same octave as the previous note, you can choose that setting in the settings panel.
Note Staff Spacing
By default, the note staff shows only the in-scale melody notes. But you can also expand the melody track to show both in-scale and out-of-scale notes. Below you can see the difference between the default “compact (in-scale)” view and the “expanded (chromatic)” view for major and minor scales.
Compact (In-Scale) Note Staff

Expanded (Chromatic) Note Staff
Looping
Use the loop cycle bar above the melody staff to control looping on your song. You can enable and disable the loop bar by clicking on it. The song will repeat through the duration of the loop bar.

Keyboard Shortcuts
Hookpad has a ton of useful keyboard shortcuts. View the keyboard shortcuts page for a complete list.
Line Breaks
By default, Hookpad fits a fixed 8 measures per line. You can force a line break by hitting enter in the measure where you want the break to occur or by selecting the measure and clicking on the “add line break” button in the measure operations GUI. To delete existing breaks, click the break box at the end of the line that contains the break to select it and hit “delete” or click the “delete break” button that will appear in the break GUI.
You can change the default 8 measures per line in the settings menu to any number of measures you wish. You can also have Hookpad automatically choose the best number of measures per line to fit your window, choose to have all your music on a single long line, or place line breaks only where you manually have placed them.
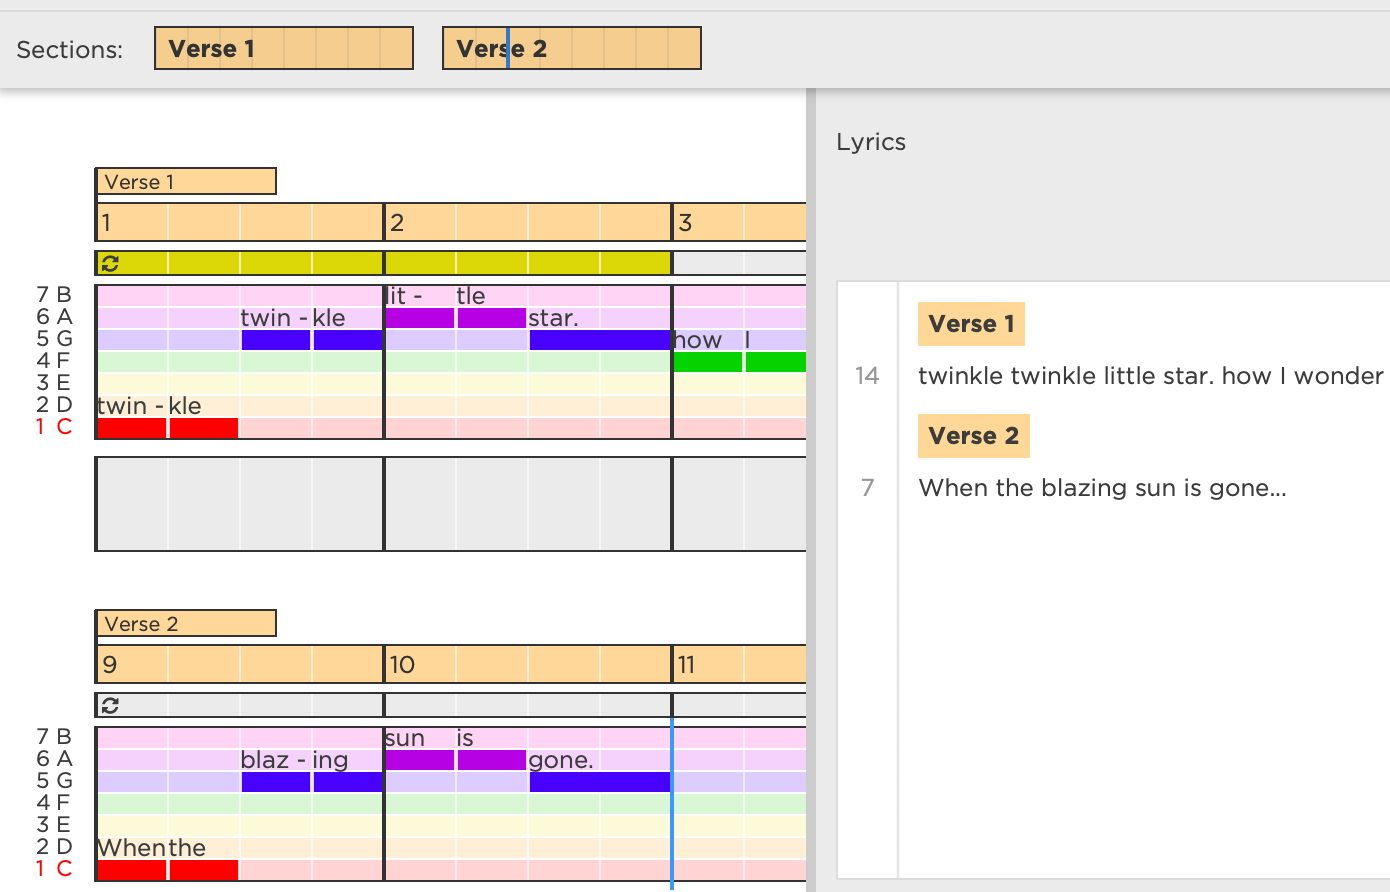
Lyrics
Hookpad lets you integrate your lyrics directly into your projects. To activate lyrics support, just click the “Lyrics” button in the top right. A tab for entering your lyrics will appear.
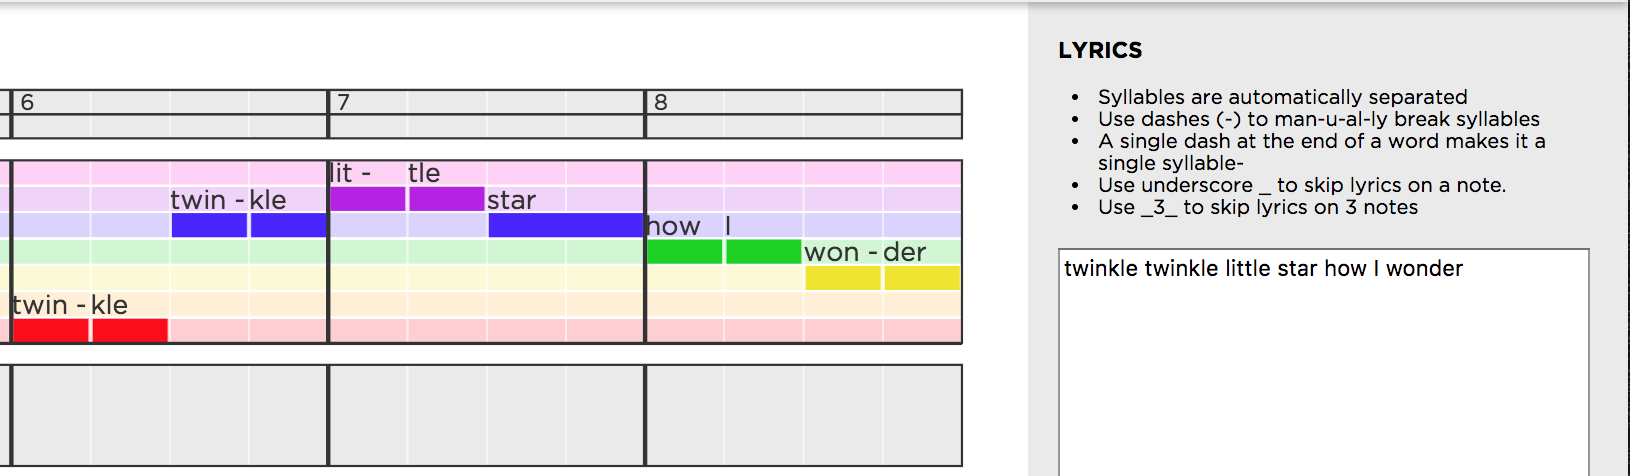
As you type your lyrics, Hookpad will automatically convert them into syllables and place the syllables above the notes in your melody:
Custom syllable separation
If you want to customize the way the words are broken up over your melody, you can use dash-es in-side your ly-rics to override Hookpad’s choice.
“Blank” lyrics
If you want to skip notes when placing lyrics, press "Tab" while in the lyrics editor and a colored box will appear indicating the number of notes you want to have no lyrics over. When the cursor is over the box, you can use type +/- to increase or decrease the number of skipped notes.
Section Aware lyrics
If you add sections to your song, the sections will appear in the lyrics panel and you can start your lyrics for each section independently.
Control Hookpad with a MIDI controller
Hookpad makes it simple to connect a MIDI piano (or other MIDI instruments) to make writing songs easier. After you connect your device, you can use it to enter notes in your melody with a real instrument instead of your computer's keyboard or the GUI. When you play a note on your instrument, Hookpad will automatically figure out what scale degree to add to your song based on the key you are currently in. If you are in the key of C major and play a C, it will enter scale degree 1 (Do); play a D, and it will enter scale degree 2 (Re); play an E, and it will enter scale degree 3 (Mi).
You can also use your instrument to enter notes in “record mode”. Just click the record button, and start playing your melody in time with the beat. It’s a great way to get your rhythms just the way you want them without having to enter them by hand.
Note that MIDI input support in Hookpad requires a web browser that supports the Web MIDI API standard. At the moment, Chrome and Edge the only major browser to support this API (but this will likely change in the future)
Syncing a YouTube
Instructions for synchronizing a YouTube video with a Hookpad project are included below. It may be helpful to watch this video that demonstrates the general process.
Video
Instructions:
- Open a new Hookpad project
- Add the YouTube video:
- Go to YouTube and find the video you want to use.
- Copy the URL
- Back in Hookpad, go to preferenes -> "Attach a YouTube video".
- In the popup window, paste the URL and click load
- You should now see a second play button with a track and sync start/end markers below the main project.
- Set YouTube start/end markers:
- To start the YouTube video, type "p" or press the lower play button.You can click anywhere in the track to rewind/fast forward the video, just like you would do on YouTube.
- Use the arrow keys to skip ahead or behind in the music.
- During YouTube playback, type "[" when the video reaches the starting point of section you want to analyze. This updates the position of the start marker.
- During YouTube playback, type "]" when the video reaches the ending point of section you want to analyze. This updates the position of the end marker.
- Type "p" or press the lower play button to stop the YouTube video.
- You can type "[" and "]" as much as you'd like during playback - they will always update the position of the start/end markers.
- The section you choose must be an integer number of measures (i.e. 4.5 measures will not work.)
- It's often helpful to tap your foot along with the music and hit [ or ] right on the downbeat of your foot tap to get a precise start/end time for your markers. The better job you can do with the start/end markers, the more in-sync the notes will light up with the melody of the music video.
- Adjust the number of measures in your project
- The project must match the number of measures that are in the YouTube clip you defined. For example, if you set the start and end markers for 8 measures of YouTube video's music, you must set number of measures in your project to 8 as well.
- You can drag the black square on the right of the melody area to remove/add measures from a track. TODO: add a gif showing this process
- Click the "+" or "-" track buttons to add/remove tracks
- Test the YouTube syncronization :
- To see how accurate your sync is, click the "test the sync" radio button above the YouTube track
- Type "p" or press the lower play button to play the YouTube video.
- In "test the sync" mode, the YouTube video plays from the start marker to the end marker and Hookpad's scrubber moves from the start to the end of your project during playback.
- If everything has been set correctly, the scrubber will move in time across each measure.
- You can use the << and >> buttons on the start/end markers to nudge them left/right for fine adjustment, or drag them with the mouse for larger adjustments. If you're way off, you can click the radio button to change the mode back to "set sync start/end". This will allow you to again use "[" and "]" as you play the YouTube Video to set the markers and you tap your foot.
- Repeat these steps, as necessary, to syncronize your project with the portion of the YouTube video you wish to analyze.
- From now on, YouTube playback should remain in "test the sync" mode
- Transcribe the song
- As you transcribe the song, it is useful to play both the piano arrangement (type spacebar or click the upper play button) and the YouTube video (type "p" or click the lower play button) so you can double check your work.
- You are free to analyze the song over time, saving and coming back to it as much as you'd like.
- Transfer your private TheoryTab to the "TheoryTab" part of the Hooktheory website:
- Once you are finished with your TheoryTab, click "save" one last time to make sure the latest version is saved to our servers.
- Provided your have saved your project and it has a YouTube video attached, there will be a link below the project that says "add my analysis to TheoryTab". Click that link.
- In the transfer form, fill in the artist and song information and pick the section from the pulldown menu. Please take the time to make sure the artist and song are spelled correctly, and are accurate. The artist's website and Wikipedia article are generally good resources for spelling.
- Once the form is complete, click "Transfer". This copies your private TheoryTab and makes it the starting point of the publicly editable TheoryTab in the "TheoryTab" part of the Hooktheory website.
- Pat yourself on the back!
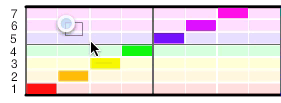
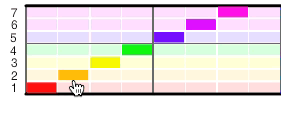
Copy & Paste
Within the Same Project
- Make a selection
- Use the keyboard shortcut “c” to copy the selection to the clipboard. Alternatively, use Edit → Copy.
- Place the cursor at the desired insertion point
- Use the keyboard shortcut “v” to paste. Alternatively, use Edit → Paste.
Between Different Projects
- In project A: make a selection
- In project A: use the keyboard shortcut “c” to copy the selection to the clipboard. Alternatively, use Edit → Copy
- In project B: place the cursor at the desired insertion point
- In project B: use Edit → “Paste From Clipboard”
In Chrome, the “Paste From Clipboard” action automatically grabs the content from your OS clipboard and pastes it at the location of the cursor. If using Firefox, Edge, or Safari, Hookpad provides a text area for you to manually paste your clipboard content (⌘C on macOS; Ctrl+C on Windows; or right-click → paste) and then inserts it at the location of the cursor.
Hookpad data is copied to the clipboard as a JSON string. Example:
{"notes":[{"sd":"1","octave":0,"beat":1,"duration":1,"isRest":false},{"sd":"2","octave":0,"beat":2,"duration":1,"isRest":false},{"sd":"3","octave":0,"beat":3,"duration":1,"isRest":false},{"sd":"4","octave":0,"beat":4,"duration":1,"isRest":false}],"chords":[],"fp":"0c473788381478f815d29b689f7d3f83931b7bc9"}Keyboard shortcuts also work with command ⌘ (macOS) and ctrl (Windows), e.g., ⌘c for copy on macOS.
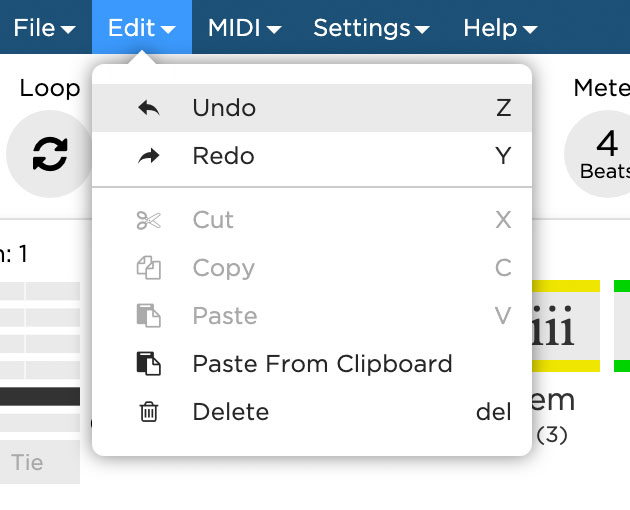
Undo & Redo
20 levels of undo/redo are supported. To undo or redo, use the keyboard shortcuts “z” and “y” or use the Edit menu, as shown below
- z → undo
- y → redo
Troubleshooting Activation
It says I need to purchase but I already did
If you have already purchased Hookpad but are getting messages when trying to use certain features that you need to purchase, there are couple possible reasons and solutions.
- If you purchased Hookpad while not signed in, then the purchase may not have been linked to any account yet. You should have received an email with an activation in it. Click the link and it will link the purchase the your account. If you can't find this email (did you look in your spam folder?), you can contact support via email (support at hooktheory dot com), and we can activate it for you.
- It's possible the purchase got linked to a different account than the one you are using. Do you have a second Hooktheory account? If you accidentally linked the purchase to the incorrect account you can contact support about it.
- Are you signed in to Hookpad? Hookpad has a separate log in system than the main website, so it is possible to be logged in to www.hooktheory.com but not Hookpad itself. Check in the upper right corner user menu to see whether you are logged in as the right user.
- If you are on a subscription plan is your account is still active? It's possible your credit card is no longer valid (or is being rejected) and your account was put on hold. Go to www.hooktheory.com/account to see whether you purchases are linked and active.
- If none of the above work, contact support at hooktheory dot com and we will locate your purchase.